12/04/2006 USB 2.0 10 bit joystick -- firmware source code, last edited 10/05/2006
Here, at files page, is firmware for USB 2.0 joystick based on MCU pic18f2550.
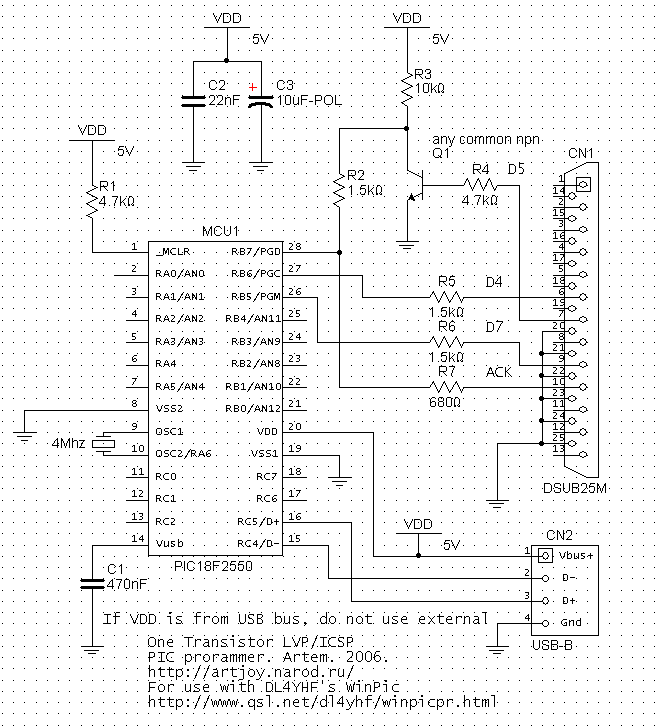
Other stuff, like schematic diagrams and PIC programmer on 1 (one) soviet transistor kt315 and 3 resistors
I'll put here later (see below already). (Soorrry, I'm a bit more lazy, than I can afford :-)
Excellent software for programming Microchip's MCUs is here: Links
I do hope also, that later I'll put here my Orbiter projects, like automatic Zenit-2 LEO insertion and Moon reaching probe,
full automatic Buran like shuttle landing from LEO and, more important, my own 3d converter from Max to Orbiter.
And now it's time to download something...
Scemaitic diagram (mostly shows LVP/ICSP circuits)
Interface file for WinPic -- "SimpleResLVPOnLptPort.ini", place into Interfaces folder
[Info]
Purpose=One transistor LVP on parallel port
[ProgrammerControlLines]
DataIn=ack
OkButton=nc
VppOnOff=D7
VddOnOff=nc
Connect=nc
ClockOut=D4
DataOut=!D5
DataOutWhileReading=1
PullMclrDown=nc
ClkEnable=nc
OutEnable=nc
RedLed=nc
GreenLed=D6
Note: Curiosly, there is about 2.6v on ACK pin of my "LPTonMotherBoard",
so though I can read and write MCU with my LV programmer, WinPic says "Could not initialize programmer!"
It is clear why, but need to be particualary noted.
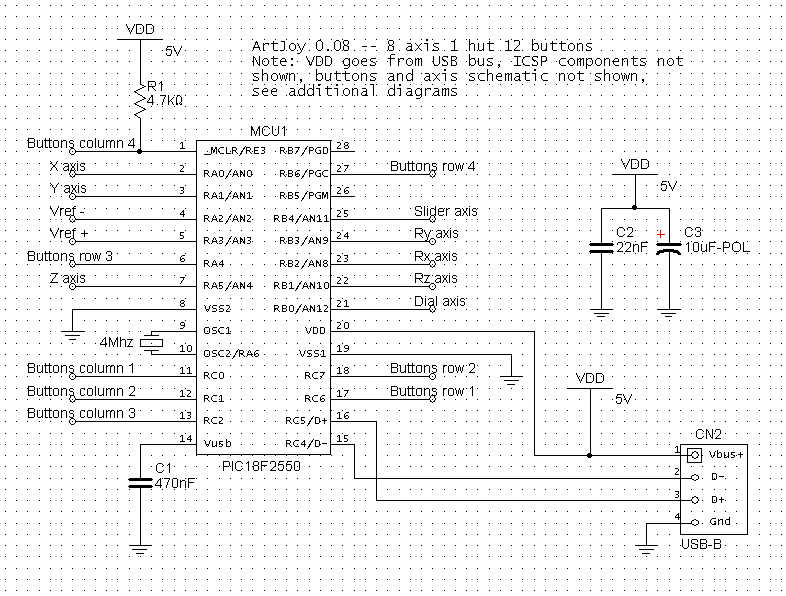
Schematic diagram for the joystick 8 axes, 1 hut and 12 buttons
Firmware is at files page.
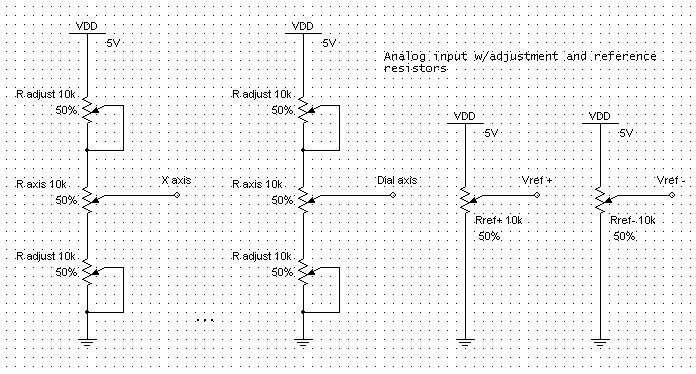
Schematic diagram for connecting axes and sensitivity adjusting resistors (Rref & Radjust)
The idea how to get true 10-bit output from resistor sensors when sense angle is less than full range resistor angle
was originally said not by me.
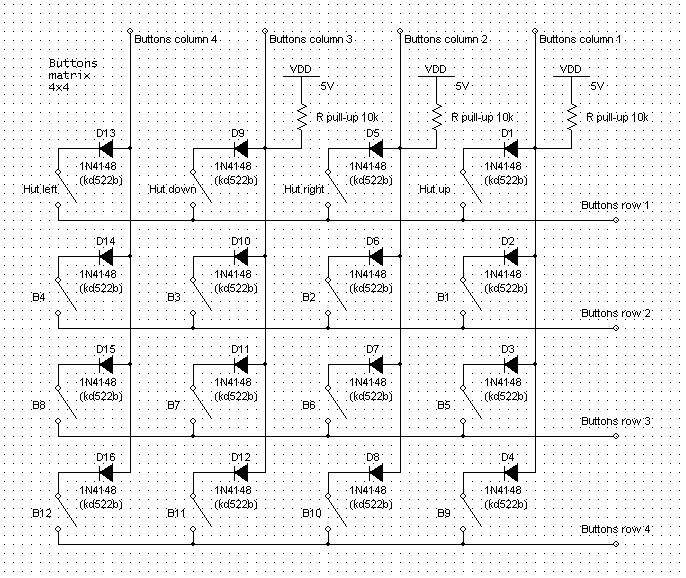
Schematic diagram for connecting hut and buttons
Well, when (and if) game controller assembled and tested it is time
to adjust axes to generate full output response.
Procedure by steps is:
1. Connect resistors to controller and set all "R adjust" to minimal resistance to exculde it influence at
initial steps.
Unused axes have to be connected to ground.
2. Connect controller to computer and start any program showing joystick axes output. Then, using Rref+ and Rref-,
adjust axis with smallest output span to give full 10-bit output span.
3. Then, using only corresponding "R adjust" resistors, make other axes to give full output span.
4. After controller works some amount of time, it may be needed to slightly adjust it again, to fix temperature influence.
Good luck and blue sky!
After all here is photos of controller